Android Jetpack - Navigation
Navigation
-
Navigation Resource 추가
res 마우스 오른쪽 클릭 -> New -> Android Resource FIle -> Resource type을 Navigation으로 설정 -> 생성
-
NavHostFragment 추가
main_activity.xml
<?xml version="1.0" encoding="utf-8"?> <LinearLayout xmlns:android="http://schemas.android.com/apk/res/android" xmlns:tools="http://schemas.android.com/tools" android:layout_width="match_parent" android:layout_height="match_parent" xmlns:app="http://schemas.android.com/apk/res-auto" android:orientation="vertical" tools:context=".MainActivity" android:id="@+id/linearLayout"> <android.support.v7.widget.Toolbar android:layout_width="match_parent" android:layout_height="wrap_content" android:background="@color/colorPrimary"> </android.support.v7.widget.Toolbar> <FrameLayout android:layout_width="match_parent" android:layout_height="0dp" android:layout_weight=".9"> <!--add NavHostFragment--> <fragment android:id="@+id/nav_host_fragment" android:name="androidx.navigation.fragment.NavHostFragment" android:layout_width="0dp" android:layout_height="0dp" app:defaultNavHost="true" app:navGraph="@navigation/nav_graph_main" /> </FrameLayout> <com.google.android.material.bottomnavigation.BottomNavigationView android:layout_width="match_parent" android:layout_height="0dp" android:background="@color/colorPrimary" android:layout_weight=".1"/> </LinearLayout> -
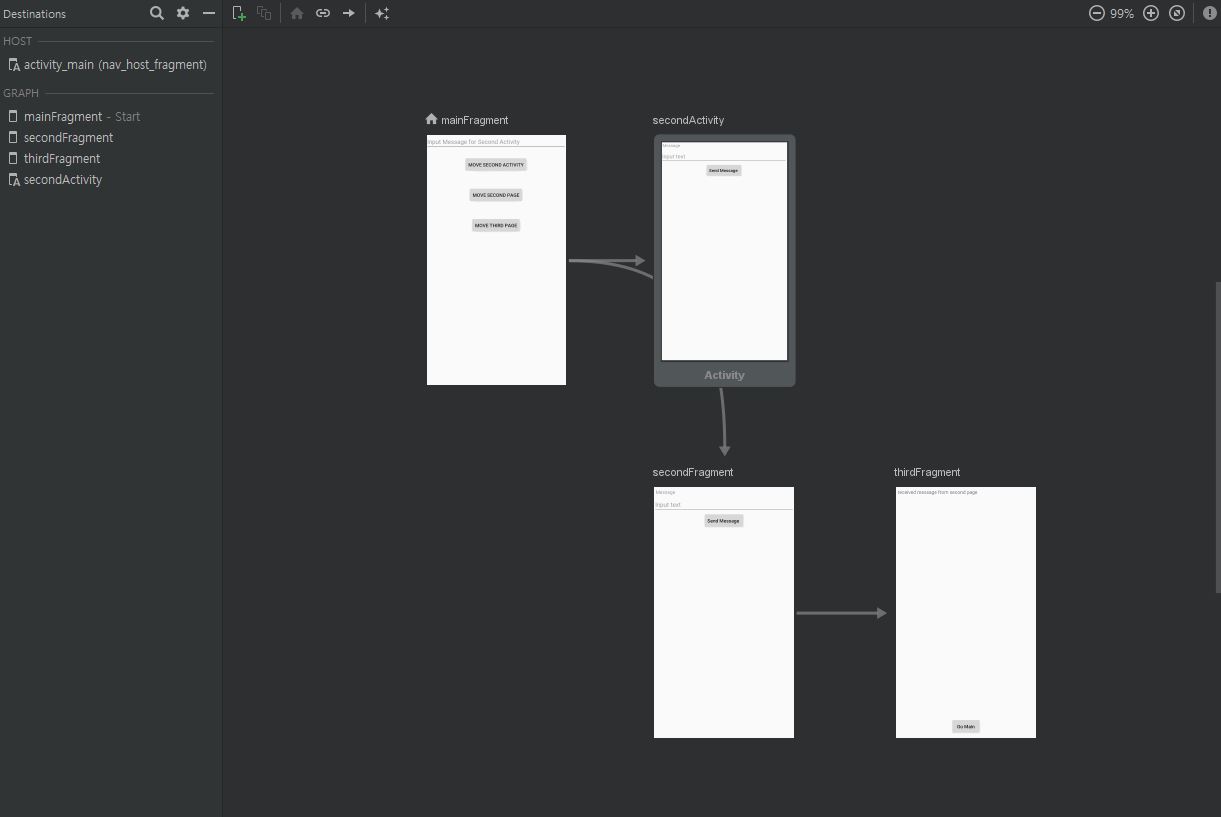
Navigation graph에 대상 추가
-
Navigation 과 BottomNavigationView 연동
activitiy에 BottomNavigationView 추가
  <com.google.android.material.bottomnavigation.BottomNavigationView
          android:id="@+id/bottomNav"
          android:layout_width="match_parent"
          android:layout_height="0dp"
          android:background="@color/colorPrimary"
          app:itemIconTint="#ffffff"
          app:itemTextColor="#000000"
          app:menu="@menu/menu_bottom_nav"
          android:layout_weight=".1"/>
#### menu_bottom_nav.xml
  <?xml version="1.0" encoding="utf-8"?>
  <menu xmlns:android="http://schemas.android.com/apk/res/android"
        xmlns:app="http://schemas.android.com/apk/res-auto">
          <item
              android:id="@id/mainFragment"
              android:title="Main Activity"
              app:showAsAction="always"/>
          <item
              android:id="@+id/secondFragment"
              android:title="Second Page"
              app:showAsAction="always"/>
          <item
              android:id="@+id/thirdFragment"
              android:title="Third Page"
              app:showAsAction="always"/>
  </menu>
item의 id를 nav_graph에 등록된 fragment id로 지정
MainActivity.xml
override fun onCreate(savedInstanceState: Bundle?) { super.onCreate(savedInstanceState) setContentView(R.layout.activity_main) setSupportActionBar(toolbar) val navController = findNavController(R.id.nav_host_fragment) NavigationUI.setupActionBarWithNavController(this, navController) //BottomNavigationView 연동 NavigationUI.setupWithNavController(bottomNav, navController) } -
Fragment 전환
findNavController().navigate(id) #### id는 nav_graph에 등록된 fragment id -
대상간에 데이터 전송
nav_graph_main
<fragment android:id="@+id/secondFragment" android:name="com.ls.project.navigation.SecondFragment" android:label="SecondPage" tools:layout="@layout/fragment_second"> <action android:id="@+id/action_secondFragment_to_thirdFragment" app:destination="@id/thirdFragment"> <argument android:name="message" app:argType="string" app:nullable="true"/> </action> </fragment> <fragment android:id="@+id/thirdFragment" android:name="com.ls.project.navigation.ThirdFragment" android:label="ThirdPage" tools:layout="@layout/fragment_third"> <argument android:name="message" app:argType="string" app:nullable="true"/>-
일반적인 방법
// 데이터를 보낼 때 val bundle = bundleOf("message" to editText.text.toString()) findNavController().navigate(R.id.thirdFragment, bundle) // 데이터를 받을 때 val receivedMessage = arguments?.getString("message") message.text=receivedMessage -
Safe Args 사용
  // 데이터를 보낼 때
  val message = editText.text.toString()
  val action = SecondFragmentDirections.actionSecondFragmentToThirdFragment(message)
  findNavController().navigate(action)

  // 데이터를 받을 때
  val receivedMessage = args.message
  message.text = receivedMessage
-
-
Global Action
  <navigation xmlns:android="http://schemas.android.com/apk/res/android"
              xmlns:app="http://schemas.android.com/apk/res-auto"
              xmlns:tools="http://schemas.android.com/tools"
              android:id="@+id/nav_graph"
              app:startDestination="@id/mainFragment">
      <action android:id="@+id/action_global_secondMain" app:destination="@id/secondActivity"/>
      ...
  </navigation>
Global Action 사용
findNavController().navigate(R.id.action_global_secondMain) -
Fragment -> Activity -> Fragment 데이터 전송
// 데이터를 보내는 fragment val message = activity_message.text.toString() val action = MainFragmentDirections.actionMainFragmentToSecondActivity(message) findNavController().navigate(action) // 데이터를 받는 activity val args: NavGraphSecondArgs by navArgs() override fun onCreate(savedInstanceState: Bundle?) { super.onCreate(savedInstanceState) setContentView(R.layout.activity_second) setSupportActionBar(second_toolbar) val navController = findNavController(R.id.second_nav_host_fragment) val bundle = bundleOf("message" to args.message) navController.setGraph(navController.graph,bundle) } //데이터를 받는 새로운 activity의 fragment val args : SecondMainFragmentArgs by navArgs() override fun onCreateView( inflater: LayoutInflater, container: ViewGroup?, savedInstanceState: Bundle? ): View? { // Inflate the layout for this fragment return inflater.inflate(R.layout.fragment_second_main, container, false) } override fun onActivityCreated(savedInstanceState: Bundle?) { super.onActivityCreated(savedInstanceState) val receivedMessage = args.message message.text = receivedMessage } -
Github 예제
-
참조
-
[Navigation]
-

Leave a comment